F.B.I. Forensic Field Kit

 
Download Link:

Ebay Hackcracktip by XfinalfantasyX

XfinalfantasyX
Yesterday, 12:50 PM EDT
Just found this on the net, so I gave it a try.

Lo and behold, it actually works.

Very handy if you are an Ebayer.
Enjoy

When you look at an item and click on bid history all the bid amount are replaced with "-" until the end of the auction.

To view these amounts before the auction ends when viewing the item change


http://cgi.ebay.co.uk/ws/eBayISAPI.dll


in the address bar to


http://cgi.ebay.com/ws/eBayISAPI.dll


And then click on the bid history. The bid amounts will be shown.


Firefox Speed Tweaks by XfinalfantasyX

XfinalfantasyX
Yesterday, 12:51 PM EDT
Yes, firefox is already pretty damn fast but did you know that you can tweak it and improve the speed even more?


That's the beauty of this program being open source.
Here's what you do:
In the URL bar, type “about:config” and press enter. This will bring up the configuration “menu” where you can change the parameters of Firefox.

Note that these are what I’ve found to REALLY speed up my Firefox significantly - and these settings seem to be common among everybody else as well. But these settings are optimized for broadband connections - I mean with as much concurrent requests we’re going to open up with pipelining… lol… you’d better have a big connection.

Double Click on the following settins and put in the numbers below - for the true / false booleans - they’ll change when you double click.

Code:
browser.tabs.showSingleWindowModePrefs – true
network.http.max-connections – 48
network.http.max-connections-per-server – 16
network.http.max-persistent-connections-per-proxy – 8
network.http.max-persistent-connections-per-server – 4
network.http.pipelining – true
network.http.pipelining.maxrequests – 100
network.http.proxy.pipelining – true
network.http.request.timeout – 300


One more thing… Right-click somewhere on that screen and add a NEW -> Integer. Name it “nglayout.initialpaint.delay” and set its value to “0”. This value is the amount of time the browser waits before it acts on information it receives. Since you’re broadband - it shouldn’t have to wait.

Now you should notice you’re loading pages MUCH faster now!

Brute Force Hacking In Terminal Server Environments

One of the most common techniques used by hackers to penetrate your network, is just plain-old password guessing. This goes for external hacking attempts as well as internal hacking attempts. In this article I will discuss how hackers can use tools to perform brute force password hacking in your Terminal Server environments and what you can to prevent these kinds of attacks.

Introduction

Guessing passwords is one of the oldest, yet one of the most effective techniques to gain access to a system. The reason that it is one of the most effective hacking techniques is because there’s aweak link in the whole process: humans. This is because humans like “samantha1” better for a password than “Tr15%^<!+”. Although the latter would be far more difficult to hack than the first password, there’s a good chance that no user would ever get the latter password memorized. This is what hackers take advantage of. The only thing a hacker needs is a logon “vehicle”. This could be a command prompt, a web page or… the Microsoft Remote Desktop Connection conveniently included in every recent version of Windows or readily available from Microsoft’s download site.

Hacking Slang

For clarity’s sake, I’ll briefly discuss some of the terms used in relation to password hacking. Basically, there are two kinds of password hacking attacks:
  • Brute force hacking a.k.a. dictionary hacking attacks
  • Password cracking a.k.a hash hacking attacks.
In this article we will be focusing on brute force hacking, using dictionary attacks. This simply means that the hacker will use a tool to automate the password guessing with an accompanying dictionary file: a file that contains every single password the hacker wants to try. Usually there aretens of thousands of passwords in a dictionary file and the hacking tool tries them all, pounding the server with logon attempts: hence the term brute force hacking.

Impact Of Password Guessing in Terminal Server environments

As in other fields of security, Terminal Server environments take up a special place. This is because Terminal Servers, by their very nature, allow interactive access. Interactive access in this context means that you’re logged on to the server itself. This is the same effect as if you were walking up to the console in the datacenter and logging on there. This basically allows you to execute any program you can get your hands on and run it in the memory space of that server. Another significant issue that arises from the fact that Terminal Servers are in the business of allowing interactive access, is an issue with the admin lockout. As you probably know, by default, the local administrator account cannot be locked out. Even if you use the passprop utility, you can only lock out the administrator account for remote logons, not interactive (Terminal Server logons). Only using passprop on Windows Server 2003 allows you to lock out the local administrator account. Because this could effectively completely lock you out of your own network, this isn’t a configuration that is used a lot. Hackers know this and use this knowledge to perform brute force hacking attempts on administrator accounts.

Terminal Server Brute Force Hacking tool: TSGrinder

There are a couple of tools out there which allow you to perform brute-force password guessing in your Terminal Server environment. The most well-known however is a free tool called TSGrinder. TSGrinder is a command line tool which very basically allows automating password guessing via RDP connections. TSGrinder is a "dictionary" based attack tool, supports multiple attack windows from a single dictionary file (you can specify this on the program command line). A very interesting option in the program is the “leet” function. This leet function enables the program to cope with a popular development in password-land. What I mean is that, from the knowledgeable user up, people tend to secure their passwords by replacing letterswith well-known symbols. For example, password becomes p@ssw0rd (replacing a’s with @’s and o’s with 0’s). This is a very well thought thorough option because as we will see trying these passwords does not require you to change your dictionary file. Another very interesting option is the “banner” option. What this option does, is acknowledge any messages prior to log on. These are the kind of messages that you have to acknowledge before you can log on to a server, usually a legal disclaimer of some sort. This logon message can be set in Group Policy in Computer Policies > Security Settings > Local Policies > Security Settings > Interactive Logon. This was an issue in earlier versions of TSGrinder but that has been fixed now. This option basically renders the banner message useless as a countermeasure to these kinds of attacks. TSGrinder also supports multiple password attempts in the same connection, and allows you to specify how many times to try a username/password combination within a particular connection (the default is 5) . This is used by hackers to help avoiding detection, because by default after 5 unsuccessful logon attempts, the Terminal Server ends the connection and an event is logged to the Terminal Server event log. The event looks like this:
 
 So in the default config of TSGrinder you could have someone trying about 1,000,000 passwords and there would not be a single event in the event log (auditing excluded, we’ll get to that). Let’s take a look at TSGrinder. The program comes with a very limited dictionary and leet file. You can be sure that hackers have far more advanced dictionaries. Running TSGrinder from the command line yields the help:

Usage: tsgrinder.exe [options] server Options: -w dictionary file (default 'dict') -l 'leet' translation file -d domain name -u username (default 'administrator' -b banner flag -n number of simultaneous threads -D debug level (default 9, lower number is more output) Example: tsgrinder.exe -w words -l leet -d workgroup -u administrator -b -n 2 10.1.1.1
As you can see usage is pretty straight-forward. You can try it on your own test server, just like I did.
Disclaimer: Use extreme caution when using this tool. Using TSGrinder could result in legal actions taken against you because your actions could be considered a real hacking attempt.
In this very simple example we will assume that:
  • we have a dictionary file called “testdict”
  • we have a leetfile called “testleet”
  • the username we are attacking is the default, administrator
  • we want to acknowledge any logon banner messages
  • we want to have 1 simultaneous thread
  • the server we are attacking has the following IP address: 192.168.62.53
That would leave us with the following command line:
tsgrinder.exe -w testdict -l testleet -b -n 1 -D 8 192.168.62.53
As you can see in the screenshot below, after a while, tsgrinder neatly finds that I’ve been using P@55w0rd! as my administrator password. It’s that easy. 


Countermeasures

OK, now that you’ve seen how easy it is to attack your Terminal Server environment, it’s time to take countermeasures. Here are some concrete suggestions that can help prevent these kinds of attacks. Rename administrator account You should know that renaming the administrator account is considered a best practice. If you were not aware of that earlier, I sure hope you are now. When you rename the (local) administrator account, the hacker cannot use the administrator account to attack and must know the exact name of the renamed administrator account. This also has the added advantage that you can create a dummy administrator account that can be locked out (you do have account lock outs configured, right?) Connection Security Ideally you would want to make sure that users are already somehow checked before they attempt to logon to a Terminal Server. This used to be a huge hassle but now there’s a free tool available that does just that and more! The tool is called 2X SecureRDP. 2X SecureRDP works by accepting or denying incoming RDP connections by IP, Mac address, computer name, client version or based on time of day, before the logon screen is even displayed. This significantly enhances the control you have over your Terminal Servers. As an added bonus you can limit users to one concurrent session. This doesn’t really prevent brute force attacks from happening but it’s a very nice feature that I know many administrators are looking for. Another great feature of this program is that you can log information for every allowed or denied connection and save it to a log file. Below is a screenshot of 2X SecureRDP. 
 
 Of course, this tool is not just for Terminal Servers,. It greatly suits every server you access via RDP. In fact, I recommend using this tool on every RDP enabled server. Auditing Enable extensive auditing. OK, so this doesn’t prevent brute force attacks from happening but at the very least it allows you too log these kinds of attacks. You should audit successful and failed logons events. Because these audit logs tend to get cluttered very soon on a busy server, you should consider an automated audit tool. These kinds of tools monitor and filter the security event logs for you so that you can see what you need to see and be alerted when anything goes bad. An example and my personal favorite of such a program is SELM (Security Event Log Monitor) from GFI. See a list of well-known similar programs here. Logon Message You should configure all of your servers to display a message at logon that must beacknowledged before you can proceed to log on to a server. This really isn’t a technical countermeasure but more of a legal one. Once you’ve acknowledged the logon message, there’s no way the perp can say: “I had no idea I wasn’t supposed to log on to that server”……..
 

Conclusion

Terminal Server environments are juicy targets for hackers. In this article I showedsome techniques hackers can use to perform brute force attacks against local administrator accounts. I also showed you what you can do to prevent these attacks. Please keep in mind that these are just pointers and only make up a small part of thesteps you should take to secure your Terminal Server environment.
 

Simple Hack To Bypass Logon Passwords On Windows 7, Vista, XP, Gentoo, Debian, Ubuntu and Fedora


magine the security nightmare if general users are able to bypass your operating system security and logon as Administrator or root account having all privileges by simply inserting an floppy or CD, now this scary situation is possible using a prototype software KON-BOOT which hacks into Windows and linux kernel on the fly while booting, the novice friendly softwares allows users to bypass logon passwords completely by simply booting via the KON-BOOT CD or Floppy disk, in its current incarnation the software has been tested to bypass logon passwords on Windows 7, Windows Vista, Windows XP, Windows Server 2003/2008, Gentoo, Ubuntu, Debian and Fedora.
Just follow the simple steps ahead to create KON-BOOT bootable CD or Floppy and bypass logon passwords easily.


  1. Download the KON-BOOT bootable CD or Floppy image, If your anti-virus software complaints disable it for a while.
  2. Burn the disk images to suitable media and configure BIOS to boot from the media first.
Here is an video demonstration of the whole process using Windows XP SP3:

Making Use Of Non-Addressable Wasted RAM On 32 Bit Systems

If you own a 32-Bit computer with more then 3 GB of RAM you must be knowing that your operating-system can only make use of roughly 3 GB RAM and rest remains unused because of memory addressing space limitation on 32 Bit systems, today I will be showing how you can make use of this wasted memory improving your computer speed significantly. The best way to utilize this wasted memory and speed-up your computer is to use it as an RAMDISK, storing frequently accessed temporary files like system pagefile, temp-files and web-browser cache, since I/O operations to RAM is significantly faster then disk you will greatly benefit from using RAMDISK as a temporary file storage.
 Follow the simple guide next to create a RAMDISK and use it to store temporary files.
  1. Download and install free Gavotte Ramdisk Utility.
  2. Extract the archive and launch ramdisk.exe.
  3. Click Install Ramdisk button. 
Once installed, configuration options will get enabled select disk-size and drive-letter as per your requirements, now select media-type as Fixed Media and click Apply button, this process will take few seconds to complete and a success confirmation dialog will get displayed.
 You can now click OK and exit the application, the new RAMDISK will be now visible in My Computer.

  1. The RamDisk can now be used as a regular disk-drive but keep in mind its temporary and any data on it will get lost on power-off, so better use it for temporary storage like pagefile, browser cache and temp file storage.
  2. To use RAMDISK as pagefile right-click My Computer and navigate to Properties -> Advanced -> Performance - Settings -> Advanced -> Virtual Memory - Change, now select the RAMDISK and set the pagefile.
  3. NOTE : If the utility fails to recognize full installed RAM capacity, simply enable the PAE mode in BOOT.INI and merge ram4g.reg registry file found in archive followed by an system reboot.  

    Write Your Own Name in Place of Start Menu

    Step 1 - Modify Explorer.exe File In order to make the changes, the file explorer.exe located at C:\Windows needs to be edited. Since explorer.exe is a binary file it requires a special editor. For purposes of this article I have used Resource Hacker. Resource HackerTM is a freeware utility to view, modify, rename, add, delete and extract resources in 32bit Windows executables and resource files (*.res). It incorporates an internal resource script compiler and decompiler and works on Microsoft Windows 95/98/ME, Windows NT, Windows 2000 and Windows XP operating systems. get this from http://delphi.icm.edu.pl/ftp/tools/ResHack.zip The first step is to make a backup copy of the file explorer.exe located at C:\Windows\explorer. Place it in a folder somewhere on your hard drive where it will be safe. Start Resource Hacker and open explorer.exe located at C:\Windows\explorer.exe. The category we are going to be using is "String Table". Expand it by clicking the plus sign then navigate down to and expand string 37 followed by highlighting 1033. If you are using the Classic Layout rather than the XP Layout, use number 38. The right hand pane will display the stringtable. We’re going to modify item 578, currently showing the word “start” just as it displays on the current Start button. There is no magic here. Just double click on the word “start” so that it’s highlighted, making sure the quotation marks are not part of the highlight. They need to remain in place, surrounding the new text that you’ll type. Go ahead and type your new entry. In my case I used Click Me!You’ll notice that after the new text string has been entered the Compile Script button that was grayed out is now active. I won’t get into what’s involved in compiling a script, but suffice it to say it’s going to make this exercise worthwhile. Click Compile Script and then save the altered file using the Save As command on the File Menu. Do not use the Save command – Make sure to use the Save As command and choose a name for the file. Save the newly named file to C:\Windows. Step 2 – Modify the Registry !!!make a backup of your registry before making changes!!! Now that the modified explorer.exe has been created it’s necessary to modify the registry so the file will be recognized when the user logs on to the system. If you don’t know how to access the registry I’m not sure this article is for you, but just in case it’s a temporary memory lapse, go to Start (soon to be something else) Run and type regedit in the Open field. Navigate to:HKEY_LOCAL_MACHINE\ SOFTWARE\ Microsoft\ Windows NT\ CurrentVersion\ Winlogon In the right pane, double click the "Shell" entry to open the Edit String dialog box. In Value data: line, enter the name that was used to save the modified explorer.exe file. Click OK. Close Registry Editor and either log off the system and log back in, or reboot the entire system if that’s your preference. If all went as planned you should see your new Start button with the revised text.[/b]

    How to improve your internet speed...?


    Microsoft reserves 20% of your available bandwidth for their own purposes like Windows Updates and interrogating your PC etc. Don't you want to get it back for your self? Here is the trick how to get 100% of your available bandwidth.
    Increase internet speed :ugeek:

    To get it back:
    Click Start then Run and type "gpedit.msc" without quotes.

    This opens the "group policy editor" and go to: "Local Computer Policy"

    Then "Computer Configuration" Then "Administrative Templates"

    Then select "Network" then "QOS Packet Scheduler"

    After that select "Limit Reservable Bandwidth".
    Double click on Limit Reservable bandwidth. It will say it is not configured, but the truth is under the 'Explain' tab i.e." By default, the Packet Scheduler limits the system to 20 percent of the bandwidth of a connection, but you can use this setting to override the default."
    So the trick is to ENABLE reservable bandwidth, then set it to ZERO. This will allow the system to reserve nothing,
    rather than the default 20

    How to Extend Time Limits on Free trial Softwares

    How would you like to be able to download software intended to be used on a free trial basis and use it indefinitely without cost never to expire? Well, there is a way you can take any free trial download and use it free for as long as you please. system-mechanic-6-pro.JPG System Mechanic 6 Pro 30 day free trial then 69.95
    Get it Free forever
    kaspersky-anti-hacker.gif Kaspersky Anti-Hacker
    Get it Free with System Mechanic Pro
    smart-protector-pro.jpg Smart Protector Pro 15 day free trial then 39.90
    Get It Free forever
    All you have to do is set your clock to some date in the distant future using adjust/date/time in Windows, download your free trial software, run the program once and rollback your time setting to the current date. After you’ve run the program for the first time, the Windows registry will be loaded with a Free Trial Key reflecting an expiration date that you’ve predetermined, and your good to go. Another roundabout way to do this after a trial has already expired would be to bring up the Registry Editor in Windows, find the trial key and delete it. Then download the program again and start the free trial period over. This is pretty easy to do, but if you’re using alot of free trials you may find it to be a hassle editing registers and downloading programs over again everytime one expires. Its much easier to simply adjust your date/time to 2009 or something, download your free trials, rollback to the current date and enjoy them for the next 3 years or so hassle free. By the way I’ve found that when doing this I’m still able to get the notifications when updated versions come along, and download them with no problem. The above screenshots are just 3 examples of the many programs that I’ve been doing this with for an extended time. If your the geek type, manipulating the dates in the registers will also work. Do some experimenting and see what you can find, there are tons of possibilities, and this is something you can have alot of fun with.

    How to Clone a Hard Drive


    Did know that you could clone your current Hard Drive without having to by extra software? Maybe you didn't know that all that you needed, was already set up on your current system? Well, it is... and if you follow this tut, you shouldn't have much of a problem.


    Make sure that you have a Master and a Slave setup on your system. The Slave drive, in this case, is where all the data on the Master is going to go to.

    First: Perform a Scandisk your Master drive and follow that with a thorough Defrag. If you have an Antivirus program, do a thorough sweep with the AV first, then do the Scandisk, followed by the Defrag.

    Second: Do the same thing to the target drive, as you did the Master: Scandisk then a thorough Defrag.

    Third: Right-click on the Target drive and click on Format. When the box comes up, click your mouse onto the "Full" button.

    Fourth: After Formatting the Target drive, run a Scandisk again and click on the button that says "Autofix Errors".

    Fifth: In this final part, you might want to cut-and-paste to code in, unless you are sure that you can do it without making any mistakes:

    Click on the "Start" button, then click on the "Run..." button, then place the following into the Runbox:

    "XCOPY C:\*.*D:\ /c/h/e/k/r" (minus the quotes, of course) then press the "Enter" button.

    If you receive an error message, then remove the space from between XCOPY and C:\

    Anything that should happen to come up in the DOS box, just click "Y" for "Yes". When its all finished, pull the original Master from the system, designate the Slave as the Master (change your jumpers), then check your new Master out.

    This tut has worked and has been tested on all systems except for Windows 2000, so you really shouldn't have any problems. If, by any chance, you should come across a snag, message me and I'll walk you through it.

    ~cheers~

    Digital Subscriber Line: Test and Improve Your Download Speed

    Many thanks and a tip of the hat to TNPCer Jerry Newman for pointing me to the DSLReports Web site for optimizing a DSL connection.
    If you have DSL you start wondering if you're getting the throughput you're paying for. I've scratched my head and puzzled, "Is the Internet just slow today or has my provider dropped the ball?" The good news is that you can test your connection's downstream and upstream speeds right from the DSLReports Web site. What's more you can study their plentiful, well-documented tips on how to optimize your system settings to get all the speed you can from your connection.
    The speed test link is:
    http://www.TheNakedPC.com/t/308/tr.cgi?dsl1
    The tips link is:
    http://www.TheNakedPC.com/t/308/tr.cgi?dsl2
    When you get to this page select your operating system (Windows, Mac, UNIX, etc.) from the "Jump to" list box then click on the Show button.
    After having performed the tests numerous times, and having read and applied the tweaks, I recommend you follow these steps.
    1. Since this is a Registry hack, all the usual caveats about editing the Registry apply. Before doing anything else, you want to see if by some happenstance your system is already optimized using the Registry "DefaultRcvWindow" hack.
    1.a. Click Start, choose Run, type "regedit" and press Enter.
    1.b. Browse to the key:
    HKEY_LOCAL_MACHINE\System\CurrentControlSet\
    Services\VxD\MSTCP
    1.c. Check to see if there's a value named DefaultRcvWindow.
    1.d. If there is no DefaultRcvWindow value, then your system is not yet optimized; if there is, note its setting but leave it alone for now.
    If there is a DefaultRcvWindow value your system may have been optimized already.
    1.e. Close the Registry Editor.
    2. Close all running applications.
    3. Start your browser and clear its cache. For IE5, select Tools, Internet Options, click the Delete Files button then click OK. For Navigator, select Edit, Preferences, Advanced, and click on Clear Memory Cache and Clear Disk Cache.
    4. Close your browser then re-open it to the speed test link.
    5. Follow the DSLReports steps 1-4 (use the Verbose test mode), remember to select the nearest download speed (nearest to what you're paying for) from the speed drop-down control, click the Test button and wait for the test to finish. The test takes about 30 seconds on my 768/128 Kbps downstream/upstream DSL connection.
    My first-time test results--not having applied the DSLReports performance tweak--were 391/121 down/up. That's 50% slower on the downstream side than what I'm paying for! Certainly a non- optimized situation. So I followed their suggestions regarding implementing the Registry DefaultRcvWindow hack. Here's what I did.
    1. I downloaded one of the ready-to-go REG files that will add the correct registry settings for you automatically. (See the table in the middle of the Windows tweaks page.) I opted to use the "Medium (32KB)" REG file for Windows 98: Rwin98-m.reg.
    2. Once I had downloaded the REG file, a quick double-click on it in Windows Explorer updated my Registry. It's appropriate to click Yes when prompted "Are you sure you want to add the information in \.reg to the registry?"
    3. Next, and this is critical, I restarted my PC. Before you retest the speed connection, if you really want to be meticulous, clear your browser's cache and restart it. (I did.) Now go to the speed test link and perform the test once more.
    My second-time test results were 624/82 Kbps. On the downstream side that's a 1.6x improvement. I FEEL THE NEED, THE NEED FOR SPEED! For a week I continued to run these tests daily by removing the DefaultRcvWindow value, rebooting, re-testing, then applying the DefaultRcvWindow hack again, rebooting, re- testing... you get the picture.
    My results are consistently averaging 680 Kbps downstream OPTIMIZED and around 390 Kbps UN-OPTIMIZED. I've also been cross-checking the DSLReports test results by downloading the same large file with an FTP client. T.J., upon following these steps, also got a nice kick: a 50% improvement in his downstream speed.
    Folks, if you have DSL I STRONGLY recommend you run through this procedure. It's given me on average a 60% improvement in my download times.

    Make FREE Calls to Landline and Mobile phones

    Make FREE calls quickly

    Simply type gizmocall.com/18005551212 into your browsers address bar.
    (put the number you want to dial in place of 18005551212)

    Make FREE calls to landline and mobile phones in over 60 countries by participating in the All Calls Free plan.

    Users NEW to the All Calls Free plan get 20 minutes of free calling simply by getting ONE friend to sign up for a new Gizmo account. There are no commitments and no hidden fees.

    Get Started Now!

    1. Tell a friend to download Gizmo5 and have them add their phone number to their profile.
    img-calls-1 Free Calls
    2. Add each other to your contact lists and you can call that person for FREE using Gizmo5.
    img-calls-3 Free Calls
    3. Be sure to make at least 1 Gizmo5 to Gizmo5 call per week or your free minutes will expire.
    img-calls-free-app Free Calls

    Free GPRS Internet on UFONE – 100 Percent Working

    A very amazing offer for Ufone users, which is that they can use GPRS over their Ufone numbers for FREE. Remember it’s a trick, not an official offer from Ufone…

    A user has found this bug in Ufone’s GPRS network, and claims that it works fine. I personally tested it and found it working…

    Updated: September 13, 2009

    Homepage: wap.ufone.com
    User: ufone
    Password: ufone
    IP Address: 172.016.013.023
    Proxy: 8080
    Access Point: ufone.ppt.wap2

    Free Unlimited Mobilink to Mobilink Calls

    You would be amazed to hear that a contributor claims that he has been using Free and Unlimited Mobilink to Mobilink Calls for last two months… wow! That’s really amazing, and i would love to test this trick.

    How it Works:

    Step 1: First of all activate Mobitunes Service, yes mobi tunes is the main thing required in this trick. Once you MobiTune Service is activated, don’t change your default Mobi Tune, which would be “Hum Bolain Mohabbat ki Zuban”….!

    Step 2: Now call from your friend’s number to your own number… and you will hear “Hum Bolain Mohabat ki Zuban”

    After a while, in 20/22 seconds, the automated voice will speak up and say “Apkey Matloba Number number sey jawab musul nehi ho rha”

    At very this instace, when operator say “App kay matlooba number….” pick your phone … and your call will be connected, and you can talk freely without eyeing your call timer.

    You can also note the time, about how long Mobi Tune is played before the operator says “App kay matlooba number…” for example its 30 seconds… just note this time. Now whenever someone will call you, you are supposed to pick the phone after 30 seconds, and allow your friends to call you for free…!


    I will test it myself too, but let me know if its working… Remember its a hack, so enjoy unlimited calling, until its debugged…!

    HACK YOUR IPOD with PwnageTool 3.1.4

    Dev Team has released PwanageTool 3.1.4. Unfortunately, there is still no support for the iPod Touch 3G. But for the majority of users their latest release will do. Here is summary by the Dev Team:

    iPhone 3G

    Use PwnageTool to do the magic and then restore with iTunes using your newly created .ipsw

    iPhone 3G(S)

    Use PwnageTool to do the magic and then restore with iTunes using your newly created .ipsw

    iPhone 2G (1st Generation)

    Use PwnageTool to do the magic and then restore with iTunes using your newly created .ipsw ‘nuff said, you don’t need to worry about anything, the baseband will be unlocked, the phone jailbroken.


    iPod Touch 1G (Original iPod Touch)

    Use PwnageTool to create a firmware image and restore with that .ipsw using iTunes.

    iPod Touch 2G

    Use PwnageTool to create a firmware image and restore with that .ipsw to your already jailbroken device using iTunes.

    iPod Touch 3G

    At this time PwnageTool does not support this device.

    * the above applies to devices that HAVE BEEN PREVIOUSLY JAILBROKEN. There is no current program that will jailbreak iPod Touches who have not jailbroken before, but the dev team said they will make one if demand peaks.

    * PwnageTool will create your .ipsw. Then go into iTunes and hold down shift will clicking restore to locate the .ipsw.

    HERE IS PwnageTool 3.1.4

    Have Fun,

    Rooster

    RAPID SHARE

    RAPID SHARE 100% FILE HOSTING

    OPTIMIZE YOUR DSL SPEED


    (c) Speedtest

    please rate

    How can hack Yahoo id via Spy ware

    It is the easiest way to hack anyone's Yahoo ID's Password.

    Follow these steps to hack the Yahoo ID

    1. U have to make a server {spyware} given ur email id.

    2. Send the server to the victim's computer anyhow.

    3. When he will open it he cant realize that it was a spyware because after opening it, it will be deleted automatically.

    4. After open this file, when he will go to login int his yahoo id his password and id will be send to ur given yahoo email id .


    5. U can also disable his OS's many features .

    There are three types of software by which u can make your own spyware {server]
    U can download anyone and use it.

    Files:

    1. Y-Jacked
    2. SH-Yahoo pass sender.
    3. Yahoo Hack.

    Create n Make @att.net ID Yahoo (Free)

    Create n Make @att.net ID Yahoo (How To)

    After gave you four tricks making Unique Yahoo ID, It is time to add other unique Yahoo ID Trick in this blog. I plan to write at least 2 or 3 more Tutorial How to make unique Yahoo Messenger ID. Now I will give you a step to make @att.net Yahoo ID. Just like making yahoo cn, btinternet, y7mail, and 9you yahoo ID, making att.net ID also need to find the correct url address registration att.net page. Your name or company will be like yourid@att.net. Just follow link bellow to open att.net registration ID Page:

    Click here to Create @att.net Yahoo ID

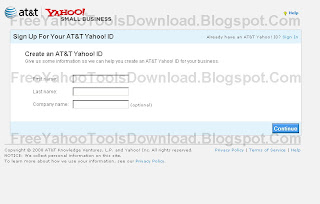
    You will see a page of att.net registration page look like this:

    Step 1 Creating att.net Yahoo Id
    Just type your First Name and Your Last name in the box at att step 1 registration page. If you want to add your company name, you can type at the box below the last name, but it is only optional that mean it is not necessary. Click yellow button "continue" in the bottom right of att.net registration page. Now you will see a page like this:

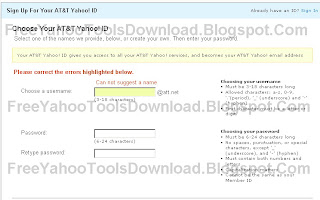
    Step 2 Creating att.net Yahoo ID Picture 1
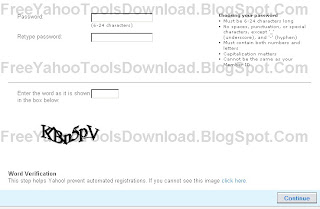
    Fill the box need to filled. Your username, your password, and then continue to add verification code text. See the picture below:

    Step 2 Creating att.net Yahoo ID Picture 2
    Then just continue your step until your registration name or ID or username of att.net Yahoo ID finished. Enjoy your new ID.

    End of Trick

    If you have any problem in making id contact me 

    Use free internet on Telenor Pakistan


    AB TELENOR SIM PER FREE INTERNET USE KARAIN BILKUL FREE
    APNAY MOBILE MAIN YE SETTING KARAIN.
    MOBILE SETTINGS
    Conection Name : TELENOR FREE
    DATA BEARER : GPRS
    PROXEY : ENABLE
    ACESS POINT : mms
    IP ADDRESS : 172.18.19.11  PORT : 8080
    User name : telenor
    Prompt Password : no
    Pasword : telenor
    Authentication : normal
    Homepage :
    PC SETTINGS
    Conect ur Phone with ur PC via cable or blutooth..
    a modem will be installed as per your connection
    go to Control Panel => Phone and Modem Options => Modems > Click on the installed modem
    click on it and click on "Properties" select tab "Advanced" write the line in extra initialization command.. AT+CGDCONT=1,"IP","mms"
    click Ok.. again OK .. and close control panel..
    now Create New Internet Connection Using Your Installed Modem..
    ISP name: "TELENOR Free"
    Dailup Number: *99#
    User Name: telenor
    Password: telenor
    do not dail it yet.....
    INTERNET EXPLORER SETTINGS
    Right Click on "Internet Explorer" => Select "Options" Select tab "Connections"
    there u will see your created internet connection " telenor Free" in dailup network setting.. click on it and then
    click "Setting".. click the "Proxy Server" check box..
    put the below line in
    Proxy server address:172.18.19.11
    put "8080" in port..
    then click ok...
    again ok
    dail ur connection "telenor Free"

    PC SEttings

    AGAR APE KAY PASS TELENOR KI SIM HAI TO PAHALAY APE TELENOR KI ORIGINAL SETTINGS RECEIVE KARAIN.
    TYPE NEW MEAASAGE ( ALL NOKIA N73 ) AND SEND IT TO 131
    AND SAVE ALL SETTINGS
    THEN YOU EDIT WAP SETTINGS AND
    CHANGE ONLY ( APN ) ACCESS POINT wap to mms AND SAVE IT AND THEN SETTINGS FOR YOU PC OPEN YOU MODEM PROPERTIES --> ADVANCE --->
    write the line in extra initialization command.. AT+CGDCONT=1,"IP","mms" OK--> OK
    AND THEN CREAT NEW CONNECTION
    NAME : TELENOR FREE
    USERNAME : telenor
    PASSWORD : telenor
    DAIL UP # : *99# OR *99***1#
    AND DAIL IT

    How to hack-change your Windows XP Boot Screen


    HACKING THE XP BOOT SCREEN


    This is a very simple trick to do if you have done the same for the logon screen and the start button. There are 2 ways to do this trick that I know about one is doing it manually and the other is using a program called bootxp. I am going to tell you the manual way to do it, but if you want to know the other way just let me know, so I can do an update to the guide. Now once you have downloaded your ntoskrnl.exe file save it a general location so that you will have easy access to it, like my folder.


    Once you have ntoskrnl.exe file in an easy access folder, restart your pc into safe mode. Once into safe mode go to the folder where your files are located.


    Now that you are there copy the file that you want to change your boot screen too. Once you have copied that file, hit the window key + r or type %windir%\system32 in the run command, so that folder as follows.


    Once there paste your new file into the folder and overwrite the existing folder.


    Now that you have your new file in the folder restart your pc as you normally would and your new boot screen should appear. You can download this bootscreen here.


    ALWAYS BACKUP EVERYTHING YOU EDIT OR DELETE. I'M NOT RESPONSIBLE IF YOU MESS YOUR COMPUTER UP BY DOING THIS HACK OR ANY TYPE OF HACK. DO IT AT YOUR OWN RISK.

    Image and ntoskrnl.exe files provided by www.themexp.org

    or
    u can go to

    code:

    http://www.overclockersclub.com/guides/hackxpbootscreen.php

    How to Get someones ISP password, Get free internet

    1.) run your telnet program:
    on windows , go to START -> RUN -> "TELNET".
    on linux , you should open a shell , and write telnet.
    2.) then connect (on windows "connect" , on linux "open") some anonymous server , if don't have any then search for one , if you are too lame then email me now! i'll give you in the minute! note: you should connect the server mail program (port "25")!
    3.) now , write the following :

    mail from:[**YOUR FRIEND'S ISP WEBMASTER**]
    rcpt to:[**YOUR FRIEND'S EMAIL ADRESS**]
    data
    Hi there [YOUR FRIEND'S NAME] , this is [NAME OF YOUR FRIEND'S ISP] support team , lately , our server had some problems with the connection and the user-password files were destroyed , a backup was then released , and it was ok.
    but yesterday we found out that it is not an updated version of the file , so , it will start charging you for a larger amount of money for each our you use!
    - - - - - - - - - - - - - -
    To correct the problem , we have made a speical program to correct the error , all YOU have to do is email :
    "[**YOUR'S FRIEND'S ISP NAME**]@GalaxyCorp.Com" and in the SUBJECT write your "user name" and "password".

    note: No moeny will be returned if you don't follow our instructions!

    thank you,
    the support team!

    4.) press enter twice and then write "."(without the "") and press ENTER!

    --
    now , the places you saw ** say that maybe you didn't understood it all , so i'll give you a simple example .

    [**YOUR FRIEND'S ISP WEBMASTER**] - example , if your friend is connected througe AOL , then type "webmaster@aol.com" , get it?

    [**YOUR FRIEND'S EMAIL ADRESS**] - example , if your friend's email is john@aol.com, then type "john@aol.com".

    [YOUR FRIEND'S NAME] - if your friend is called "John" then type "John".

    [NAME OF YOUR FRIEND'S ISP] - if your friend is connected through AOL(American Online) , then type "American - Online"

    "[**YOUR'S FRIEND'S ISP NAME**]@GalaxyCorp.Com" - this is the hard-part , but if you are reading this , then don't worry , you're one step from the end! ..

    * launch your WWW browser(MICROSOFT INTERNET EXPLORER\NETSCAPE) , and type "HTTP://www.galaxycorp.com".

    * Sign there for an account , now , when they ask you what username you want, then try the closest thing to your ISP name(ex - if your friend is connected thourgh American Online[AOL] then try "aol" or "a_o_l" or "american_online" !)

    * and when they ask for your email , type your Real one!!!
    now continue in your normal life , and remember to read your email!
    if you suddenly get a message from your friend's email adress , and the subject is "john j4o87HnzG" then , guess what , you just saved 10$ a month!

    How to fix corrupted files in XP

    //////////////////////////////////////////////////////////////////////////////////
    // ** How to fix corrupted files in XP ** //
    // ** This tutorial was writing by: SAJID ** //
    //////////////////////////////////////////////////////////////////////////////////
    // ** H|LLJD00 does not take any responsibility for your actions ** //
    // ** H|LLJD00 takes no responsible for any damage caused by this tutorial ** //
    //////////////////////////////////////////////////////////////////////////////////

    ** Contents **
    (1) Introduction
    (2) Required
    (3) Actual Tutorial
    (4) Copyright Notice

    // Introduction //
    This tutorial has been made so people that are having problems with corrupted files, can learn how to fix them easy.

    // Required //
    + Windows XP operating system
    + Windows XP cd

    // Right to the tutorial //
    + Place the xp cd in your cd/dvd drive
    + Go to start
    + run
    + type in 'sfc /scannow' (without the ')

    Now it should all load, and fix all your corrupted file on windows XP :)


    ////////////////////////////////////////////////////////////////////////////////////////////////////////////////////
    // ** (c) Copyright 2010 SAJID. All Rights Reserved ** //
    // ** If you wish to use this tutorial on your website please leave all credit and detials as it is. Thank you ** //
    ////////////////////////////////////////////////////////////////////////////////////////////////////////////////////

    how to edit right click menu

    How To Remove and Add Right-Click Menu Items from Files and Folders
    Removing Items
    A lot of programs you install will add themselves to the right-click menu of your files and/or folders. And most times, you have no choice in the matter and, as a result, your right-click menu can get very long with added items you don't even use. The last person I was helping with this had a right context menu so long that the Rename option was no longer visible!
    Fortunately, you can easily remove those unwanted menu items, if you know the registry values to edit. And it's not at all difficult once you know the keys responsible for the additions.

    For Files, the secret lies in the "context menu handlers" under the shellex subkey for "All Files" which, in the registry, is nothing but an asterisk - like a dos wildcard, which means the values entered apply to all files. It is at the very top of the Root key, right here:

    HKEY_CLASSES_ROOT\*\shellex\ContextMenuHandlers

    Click the the + sign next to the ContextMenuHandlers key, to expand it.
    Now you will see some of the programs that have added items to your right-click menu. Simply delete the program keys you don't want.
    Yup! It's that simple. If deleting makes you uneasy, just export the key before deleting it. Or, instead of deleting the values, disable them. Simply double click the default value for the program on the right hand pane and rename the clsid value by placing a period or dash in front of it.
    ie; - {b5eedee0-c06e-11cf-8c56-444553540000}
    Then exit the registry, refresh, and right click a file to see if the item was removed from the menu.
    Some programs - like WinZip or WinRar - will add several items to your right click menu but all of them will be removed by deleting or disabling their one context menu handler.

    Note that the above key only applies to the right click menu of files.
    To remove entries from the right click context menu of folders, you need to navigate to the Folder and Drive keys:

    HKEY_CLASSES_ROOT\Folder\shellex\ContextMenuHandlers
    HKEY_CLASSES_ROOT\Drive\shellex\ContextMenuHandlers

    All you have to do is follow the same procedure as for Files - either disable or delete items you wish to remove.
    Adding Items
    Adding Items to the right click menu of Files and Folders is also fairly simple using the Registry. It just involves the creation of a few new keys for each item you wish to add. You edit the same keys used for removing items. Let's use Notepad as an example of an item you'd like to add to the right click menu of all your files or folders.

    For folders, go to this key:
    HKEY_CLASSES_ROOT\Folder
    Click the + sign next to Folder and expand it so that the Shell key is visible. Right click the Shell key and choose New>Key and name the key Notepad or whatever else you'd prefer (whatever the key is named is what will appear in the right-click menu). Now right click the new key you made and create another key named Command. Then, in the right hand pane, double click "Default" and enter Notepad.exe as the value.
    Exit the registry, refresh, and right click any folder. Notepad should now be on the context menu.


    For files, go here again:

    HKEY_CLASSES_ROOT\*
    Expand the * key and see if a Shell key exists. If it does exist, follow the same procedure as for folders. If it does not exist, you'll have to create a new Shell first. Just right click the * key and choose New>Key and name it Shell. Then right click the Shell key and continue on the same way you did for adding items to the right click menu of folders.
    Once done, Notepad should appear as an option in the right click menu of all your files.
    Vic Ferri owns the very popular WinTips and Tricks email group. He is also in charge of the Printing Tips and Registry Tips pages at Linda's Computer Stop.

    How to clear Bios info

    READ EVEYTHING BEFORE YOU USE ANY METHOD LISTED BELOW

    Basic BIOS password crack - works 9.9 times out of ten
    This is a password hack but it clears the BIOS such that the next time you start the PC, the CMOS does not ask for any password. Now if you are able to bring the DOS prompt up, then you will be able to change the BIOS setting to the default. To clear the CMOS do the following:
    Get DOS prompt and type:
    DEBUG hit enter
    -o 70 2e hit enter
    -o 71 ff hit enter
    -q hit enter
    exit hit enter
    Restart the computer. It works on most versions of the AWARD BIOS.


    Accessing information on the hard disk
    When you turn on the host machine, enter the CMOS setup menu (usually you have to press F2, or DEL, or CTRL+ALT+S during the boot sequence) and go to STANDARD CMOS SETUP, and set the channel to which you have put the hard disk as TYPE=Auto, MODE=AUTO, then SAVE & EXIT SETUP. Now you have access to the hard disk.

    Standard BIOS backdoor passwords
    The first, less invasive, attempt to bypass a BIOS password is to try on of these standard manufacturer's backdoor passwords:
    AWARD BIOS
    AWARD SW, AWARD_SW, Award SW, AWARD PW, _award, awkward, J64, j256, j262, j332, j322, 01322222, 589589, 589721, 595595, 598598, HLT, SER, SKY_FOX, aLLy, aLLY, Condo, CONCAT, TTPTHA, aPAf, HLT, KDD, ZBAAACA, ZAAADA, ZJAAADC, djonet, %øåñòü ïpîáåëîâ%, %äåâÿòü ïpîáåëîâ%
    AMI BIOS
    AMI, A.M.I., AMI SW, AMI_SW, BIOS, PASSWORD, HEWITT RAND, Oder
    Other passwords you may try (for AMI/AWARD or other BIOSes)
    LKWPETER, lkwpeter, BIOSTAR, biostar, BIOSSTAR, biosstar, ALFAROME, Syxz, Wodj
    Note that the key associated to "_" in the US keyboard corresponds to "?" in some European keyboards (such as Italian and German ones), so -- for example -- you should type AWARD?SW when using those keyboards. Also remember that passwords are Case Sensitive. The last two passwords in the AWARD BIOS list are in Russian.

    Flashing BIOS via software
    If you have access to the computer when it's turned on, you could try one of those programs that remove the password from the BIOS, by invalidating its memory.
    However, it might happen you don't have one of those programs when you have access to the computer, so you'd better learn how to do manually what they do. You can reset the BIOS to its default values using the MS-DOS tool DEBUG (type DEBUG at the command prompt. You'd better do it in pure MS-DOS mode, not from a MS-DOS shell window in Windows). Once you are in the debug environment enter the following commands:
    AMI/AWARD BIOS
    O 70 17
    O 71 17
    Q
    PHOENIX BIOS
    O 70 FF
    O 71 17
    Q
    GENERIC
    Invalidates CMOS RAM.
    Should work on all AT motherboards
    (XT motherboards don't have CMOS)
    O 70 2E
    O 71 FF
    Q
    Note that the first letter is a "O" not the number "0". The numbers which follow are two bytes in hex format.

    Flashing BIOS via hardware
    If you can't access the computer when it's on, and the standard backdoor passwords didn't work, you'll have to flash the BIOS via hardware. Please read the important notes at the end of this section before to try any of these methods.

    Using the jumpers
    The canonical way to flash the BIOS via hardware is to plug, unplug, or switch a jumper on the motherboard (for "switching a jumper" I mean that you find a jumper that joins the central pin and a side pin of a group of three pins, you should then unplug the jumper and then plug it to the central pin and to the pin on the opposite side, so if the jumper is normally on position 1-2, you have to put it on position 2-3, or vice versa). This jumper is not always located near to the BIOS, but could be anywhere on the motherboard.
    To find the correct jumper you should read the motherboard's manual.
    Once you've located the correct jumper, switch it (or plug or unplug it, depending from what the manual says) while the computer is turned OFF. Wait a couple of seconds then put the jumper back to its original position. In some motherboards it may happen that the computer will automatically turn itself on, after flashing the BIOS. In this case, turn it off, and put the jumper back to its original position, then turn it on again. Other motherboards require you turn the computer on for a few seconds to flash the BIOS.
    If you don't have the motherboard's manual, you'll have to "brute force" it... trying out all the jumpers. In this case, try first the isolated ones (not in a group), the ones near to the BIOS, and the ones you can switch (as I explained before). If all them fail, try all the others. However, you must modify the status of only one jumper per attempt, otherwise you could damage the motherboard (since you don't know what the jumper you modified is actually meant for). If the password request screen still appear, try another one.
    If after flashing the BIOS, the computer won't boot when you turn it on, turn it off, and wait some seconds before to retry.

    Removing the battery
    If you can't find the jumper to flash the BIOS or if such jumper doesn't exist, you can remove the battery that keeps the BIOS memory alive. It's a button-size battery somewhere on the motherboard (on elder computers the battery could be a small, typically blue, cylinder soldered to the motherboard, but usually has a jumper on its side to disconnect it, otherwise you'll have to unsolder it and then solder it back). Take it away for 15-30 minutes or more, then put it back and the data contained into the BIOS memory should be volatilized. I'd suggest you to remove it for about one hour to be sure, because if you put it back when the data aren't erased yet you'll have to wait more time, as you've never removed it. If at first it doesn't work, try to remove the battery overnight.
    Important note: in laptop and notebooks you don't have to remove the computer's power batteries (which would be useless), but you should open your computer and remove the CMOS battery from the motherboard.

    Short-circuiting the chip
    Another way to clear the CMOS RAM is to reset it by short circuiting two pins of the BIOS chip for a few seconds. You can do that with a small piece of electric wire or with a bent paper clip. Always make sure that the computer is turned OFF before to try this operation.
    Here is a list of EPROM chips that are commonly used in the BIOS industry. You may find similar chips with different names if they are compatible chips made by another brand. If you find the BIOS chip you are working on matches with one of the following you can try to short-circuit the appropriate pins. Be careful, because this operation may damage the chip.
    CHIPS P82C206 (square)
    Short together pins 12 and 32 (the first and the last pins on the bottom edge of the chip) or pins 74 and 75 (the two pins on the upper left corner).
    gnd
    74
    |__________________
    5v 75--| |
    | |
    | |
    | CHIPS |
    1 * | |
    | P82C206 |
    | |
    | |
    |___________________|
    | |
    | gnd | 5v
    12 32
    OPTi F82C206 (rectangular)
    Short together pins 3 and 26 (third pin from left side and fifth pin from right side on the bottom edge).
    80 51
    |______________|
    81 -| |- 50
    | |
    | |
    | OPTi |
    | |
    | F82C206 |
    | |
    100-|________________|-31
    || | |
    1 || | | 30
    3 26

    Dallas DS1287, DS1287A
    Benchmarq bp3287MT, bq3287AMT
    The Dallas DS1287 and DS1287A, and the compatible Benchmarq bp3287MT and bq3287AMT chips have a built-in battery. This battery should last up to ten years. Any motherboard using these chips should not have an additional battery (this means you can't flash the BIOS by removing a battery). When the battery fails, the RTC chip would be replaced.
    CMOS RAM can be cleared on the 1287A and 3287AMT chips by shorting pins 12 and 21.
    The 1287 (and 3287MT) differ from the 1287A in that the CMOS RAM can't be cleared. If there is a problem such as a forgotten password, the chip must be replaced. (In this case it is recommended to replace the 1287 with a 1287A). Also the Dallas 12887 and 12887A are similar but contain twice as much CMOS RAM storage.
    __________
    1 -| * U |- 24 5v
    2 -| |- 23
    3 -| |- 22
    4 -| |- 21 RCL (RAM Clear)
    5 -| |- 20
    6 -| |- 19
    7 -| |- 18
    8 -| |- 17
    9 -| |- 16
    10 -| |- 15
    11 -| |- 14
    gnd 12 -|__________|- 13

    NOTE: Although these are 24-pin chips,
    the Dallas chips may be missing 5 pins,
    these are unused pins.
    Most chips have unused pins,
    though usually they are still present.

    Dallas DS12885S
    Benchmarq bq3258S
    Hitachi HD146818AP
    Samsung KS82C6818A
    This is a rectangular 24-pin DIP chip, usually in a socket. The number on the chip should end in 6818.
    Although this chip is pin-compatible with the Dallas 1287/1287A, there is no built-in battery.
    Short together pins 12 and 24.
    5v
    24 20 13
    |___________|____________________|
    | |
    | DALLAS |
    |> |
    | DS12885S |
    | |
    |__________________________________|
    | |
    1 12
    gnd

    Motorola MC146818AP
    Short pins 12 and 24. These are the pins on diagonally opposite corners - lower left and upper right. You might also try pins 12 and 20.
    __________
    1 -| * U |- 24 5v
    2 -| |- 23
    3 -| |- 22
    4 -| |- 21
    5 -| |- 20
    6 -| |- 19
    7 -| |- 18
    8 -| |- 17
    9 -| |- 16
    10 -| |- 15
    11 -| |- 14
    gnd 12 -|__________|- 13

    Replacing the chip
    If nothing works, you could replace the existing BIOS chip with a new one you can buy from your specialized electronic shop or your computer supplier. It's a quick operation if the chip is inserted on a base and not soldered to the motherboard, otherwise you'll have to unsolder it and then put the new one. In this case would be more convenient to solder a base on which you'll then plug the new chip, in the eventuality that you'll have to change it again. If you can't find the BIOS chip specifically made for your motherboard, you should buy one of the same type (probably one of the ones shown above) and look in your motherboard manufacturer's website to see if there's the BIOS image to download. Then you should copy that image on the chip you bought with an EPROM programmer.

    Important
    Whether is the method you use, when you flash the BIOS not only the password, but also all the other configuration data will be reset to the factory defaults, so when you are booting for the first time after a BIOS flash, you should enter the CMOS configuration menu (as explained before) and fix up some things.
    Also, when you boot Windows, it may happen that it finds some new device, because of the new configuration of the BIOS, in this case you'll probably need the Windows installation CD because Windows may ask you for some external files. If Windows doesn't see the CD-ROM try to eject and re-insert the CD-ROM again. If Windows can't find the CD-ROM drive and you set it properly from the BIOS config, just reboot with the reset key, and in the next run Windows should find it. However most files needed by the system while installing new hardware could also be found in C:WINDOWS, C:WINDOWSSYSTEM, or C:WINDOWSINF .

    Key Disk for Toshiba laptops
    Some Toshiba notebooks allow to bypass BIOS by inserting a "key-disk" in the floppy disk drive while booting. To create a Toshiba Keydisk, take a 720Kb or 1.44Mb floppy disk, format it (if it's not formatted yet), then use a hex editor such as Hex Workshop (***.bpsoft.com/downloads/index.html) to change the first five bytes of the second sector (the one after the boot sector) and set them to 4B 45 59 00 00 (note that the first three bytes are the ASCII for "KEY" followed by two zeroes). Once you have created the key disk put it into the notebook's drive and turn it on, then push the reset button and when asked for password, press Enter. You will be asked to Set Password again. Press Y and Enter. You'll enter the BIOS configuration where you can set a new password.


    Key protected cases
    A final note about those old computers (up to 486 and early Pentiums) protected with a key that prevented the use of the mouse and the keyboard or the power button. All you have to do with them is to follow the wires connected to the key hole, locate the jumper to which they are connected and unplug it.

    How To Change Thumbnail Size And Quality

    If any of you out there like to use the thumbnail view, especially for browsing through photos and images, it can become a bit of a drain on your system. It is possible to lower the thumbnail size and quality by editing the following registry keys.

    Open the registry and navigate to :

    HKEY_CURRENT_USER\ Software\ Microsoft \ Windows\ CurrentVersion\ Explorer

    Create a new DWORD value called ThumbnailSize, and set the value between 32 and 256.

    And/or create another DWORD value called ThumbnailQuality, and set the value between 50 and 100.

    Key Details :

    USER Key: [HKEY_CURRENT_USER\ Software\ Microsoft \ Windows\ CurrentVersion\ Explorer]
    Value Name: ThumbnailSize
    Data Type: REG_DWORD (DWORD Value)
    Data Value: 32 - 256

    USER Key: [HKEY_CURRENT_USER\ Software\ Microsoft \ Windows\ CurrentVersion\ Explorer]
    Value Name: ThumbnailQuality
    Data Type: REG_DWORD (DWORD Value)
    Data Value: 50 - 100

    HOW TO BLOCK PEOPLE ON WINMX WHO SHARE NOTHING

    Some people seem to think our network is a kind of a store a they just pick what they want without sharing anything!
    (and other considere our net as a schoolyard where one "trade"... Childish!)

    *********************

    You can help everybody getting rid of them by boycotting them that way:

    You "browse" each uploading user.


    ** If he/she shares more than, say, a hundred files (and NOT in the WinMx directory only, putting them elsewhere and unshared when entirely downloaded !!!), OK.
    NB: a hundred is not a lot but 1- we don't all have a large HDD and some files are big 2- when you begin...!
    ** If not:

    You can send a message to him/her to ask why there is no real share, or not at all, for they can have forgotten to do so: give them a chance! The first time, I didn't understand that I had to choose the shared files types, so I shared nothing, unwillingly. Somebody told it to me in a message.

    If no answer and/or still no shared file, you can exclude the selfish beast:
    (Thanks to dwhite who gave the modus operandi on the WinMx net)

    To block somebody from downloading, add the name to your HOTLIST (right-click the name then "Add to hotlist") then to your IGNORE list.

    You won't receive any messages nor will they enter your queue, during that session at least.

    ********************

    On the contrary, you can help people who share a lot by starting the tranfer when they are in your queue, or give a higher bandwith priority...

    Hide Drives and Partitions

    Do you have data on a partition or hard drive that you don't want tampered with or easily accessible to other users? Well, you can hide any drive/partition in Windows XP, NT, and 2000. That means that they won't show up in Explorer or My Computer.

    If you want access to that drive from your user account you should create a desktop shortcut before proceeding. Once hidden, you can still access by typing the drive letter and a colon in Start/Run—for example, "D:" will bring up a folder of the contents on your D drive.

    The easiest way with Win XP is to use the TweakUI power toy from Mcft. Go to Start/Run and type in "tweakui" (without the quotes).

    Go to My Computer/Drives and uncheck the drive/partition(s) you want hidden. Click "Apply" or "OK" when finished.

    If you have XP but not Tweak UI you can download it here...
    http://www.Mcft.com/windowsxp/downloads/powertoys/xppowertoys.mspx

    For Win NT, 2000, and XP you can use the following Registry edit:

    *Be sure to back up the Registry before proceeding
    http://www.worldstart.com/tips/tips.php/401

    Open the Registry Editor by going to Start/Run and typing in "regedit" (without the quotes). Find your way to...

    HKEY_CURRENT_USER\Software\Mcft\Windows\CurrentVersion\Policies

    Click on "Explorer".

    Double-click the "NoDrives" key in the right column. If you don't find a "NoDrives" registry key, just right-click in the right pane and choose "New/DWORD Value" then name the key "NoDrives".

    You'll see a value like "0000 00 00 00 00". This is where the fun starts. The four sets of double zeros (after the "0000") are where you'll enter the values for the drive/partitions. Now, stay with me on this—it's not as complicated as it sounds:

    The first column is for drives A-H, the second for I-P, the third for Q-X, and the fourth for Y-Z.

    The values for each drive are as follows:

    1 - A I Q Y
    2 - B J R Z
    4 - C K S
    8 - D L T
    16 - E M U
    32 - F N V
    64 - G O W
    80 - H P X

    So, let's say you want to hide drive D. In the first column you would put "08". For drive K you would put "04" in the second column.

    But what if you want to hide more than one drive in a column? Simply add the values together: D+E = 8+16 = 24. So in the first column you would put "24".

    Still baffled? If you have XP then go get TweakUI and save yourself the math.

    Whichever method you use, you can rest easy knowing that the files on that drive or partition are less accessible to other users.

    Free World Dialup

    Free World Dialup - http://www.freeworlddialup.com/
    "Use FWD to make real, free phone calls using your favorite telephone, computer or PDA and any broadband connection. Call your neighbor or a relative, next door or in another country; all with the same ease, speed, and high quality." Thanks to Jeff Pulver and his crew!

    Quick summary:

    1 - First, got to http://www.freeworlddialup.com and sign up to get your FWD # and password.
    2 - Download http://brands.xten.net/x-litefwd/download/X-LiteFWD_Install.exe FWD/X-Lite ("self-configures") program or go to http://www.myphonebooth.com/ to call any FWD # and U.S. toll free #s using Internet Explorer (Firefox not supported).

    Quickstart Guide: http://www.freeworlddialup.com/support/quick_start_guide
    FWD Xlite Configuration Guide: http://www.freeworlddialup.com/support/configuration_guide/configure_your_fwd_certified_phone/fwd_xlite/all
    MS Windows Messenger Configuration Guide: http://pulver.com/fwd/fwd30news.html#messenger (FWD supports Windows Messenger 4.6/4.7 but not MSN Messenger 5.x.)

    3 - To call a U.S. landline/cell #, dial *+arecode+7digit#. (This FWD feature is not listed on their website, but has been working for several months now.)

    4 - To call a FWD # from a PSTN (your regular phone), click
    http://www.dslreports.com/r0/download/476274~3ccc4c9edbe2a596714a4fd9da897204/fwdaccessnumbers.zip or after you've signed up go to FWD web page, click on "Features", "Access #s" for a list of FWD access numbers in your area. Available in several states in the U.S., UK, NL and DE at this time.

    Packet8:
    -- To call a P8 phone # from a FWD phone: Dial **898 + 1 + P8 number to be routed to P8 service.
    -- To call a FWD # from a P8 phone:
    *If the FWD # you are calling contains 5 digits, start to dial with the prefix 0351. For example: 035112345
    *If the FWD # you are calling contains 6 digits, start to dial with the prefix 0451.

    Call UK:
    Get a UK telephone # that will call you on your FWD #. Register http://fwd.calluk.com.

    FWD Features: Some features like Voice email needs to be activated at http://www.fwdnet.net

    Internet Calling
    Call Waiting
    CallerID
    Missed Call notification
    Call Forwarding
    Call Transfer
    Three Way Calling
    Voice email
    SoftPhone, IP Phones & *Web-based
    Aliases
    Whitepages directory
    ENUM Entry
    eDial SOAP
    Conferencing
    Instant Messaging
    Web Calling/FWD-Talk
    Corporate Cisco Call Manager Connection
    Calling to Toll Free Numbers in the UK, US, NL, JP and FR TellMe Service (411).
    -- NL Dial *31(800)... to reach Netherlands toll free #s.
    -- UK Dial *44(800)... or *44(808)... or *44 (500) to reach UK toll free #s.
    -- US Dial *1(8xx) xxx xxxx to reach United States toll free #s.
    -- JP Dial *81 0120... to reach Japan toll free #s.

    Frequently used numbers
    613 Echo test
    55555 Volunteer Welcome Line
    514 FWD Coffee House
    612 Time
    411 TellMe Information
    611 Part Time Technical support
    511 FWD Conference Bridge

    At the moment, I think this is way better than Skype, Yahoo IM voice chat, etc...I've been using FWD for over a year with my cable broadband service and didn't have to set up any port forwarding on my broadband router. Obviously you'ld need a mic/speakers connected to your PC.

    You can also use your regular telephone via an adapter http://voipstore.pulver.com/product_info.php?products_id=32 and IP phone http://voipstore.pulver.com/product_info.php?products_id=33. Adapters and IP phones from different vendors like Cisco are available.

    * Broadbandreports.com VoIP forum (formerly known as DSLReports.com)
    -- If you have any questions or just curious about VoIP, visit the VoIP forum http://www.dslreports.com/forum/voip at DSLReports.com.

    Free Access To Websites Without Registering

    Go to

    -http://bugmenot.com/

    and type the URL of the website you want to log into.
    Examples:

    -http://www.nytimes.com/, -http://www.winnetmag.com/
    etcetera.

    Another (and better) way is changing the user agent of your browser to:
    Googlebot/2.1+

    -http://www.googlebot.com/bot.html

    This is very easy in Mozilla's Firefox. Download and install the User Agent Switcher from

    -http://www.chrispederick.com/work/firefox/useragentswitcher/
    and add the Googlebot user agent.

    Have fun, Dead Dreamer!

    -]Edit[- Now this kicks ass, was just browsing entire forum without even needing to login to view restricted areas, and it works on other sites
    And no, you cant access the hidden forums either, already tried that

    Disable Windows logo key

    i was recently playing games and this nasty windos logo key keep annoying me , cause i often accidently clicked it , and i start to search a solution to solve my problem, and found the following article in microsfot website, and it did work, hope this helps, thanks!

    CODE
    http://support.microsoft.com/?kbid=181348


    or in other articles, u can copy the following messages into ur notepad and save as *.reg, and use it..

    Windows Registry Editor Version 5.00

    [HKEY_LOCAL_MACHINE\SYSTEM\CurrentControlSet\Control\Keyboard Layout]
    "Scancode Map"=hex:00,00,00,00,00,00,00,00,03,00,00,00,00,00,5b,e0,00,00,5c,e0,\
    00,00,00,00

    Disable DONT SEND Error

    o disable the stupid feature in WinXP which tries to send a report to microsoft every time a program crashes you will have to do this:

    *************************************************************************

    Open Control Panel
    Click on Preformance and Maintenance.
    Click on System.
    Then click on the Advanced tab
    Click on the error reporting button on the bottom of the windows.
    Select Disable error reporting.
    Click OK
    Click OK

    *************************************************************************

    Delete An "undeletable" File

    Open a Command Prompt window and leave it open.
    Close all open programs.
    Click Start, Run and enter TASKMGR.EXE
    Go to the Processes tab and End Process on Explorer.exe.
    Leave Task Manager open.
    Go back to the Command Prompt window and change to the directory the AVI (or other undeletable file) is located in.
    At the command prompt type DEL where is the file you wish to delete.
    Go back to Task Manager, click File, New Task and enter EXPLORER.EXE to restart the GUI shell.
    Close Task Manager.


    Or you can try this

    Open Notepad.exe

    Click File>Save As..>

    locate the folder where ur undeletable file is

    Choose 'All files' from the file type box

    click once on the file u wanna delete so its name appears in the 'filename' box

    put a " at the start and end of the filename
    (the filename should have the extension of the undeletable file so it will overwrite it)

    click save,

    It should ask u to overwrite the existing file, choose yes and u can delete it as normal


    Here's a manual way of doing it. I'll take this off once you put into your first post zain.

    1. Start
    2. Run
    3. Type: command
    4. To move into a directory type: cd c:\*** (The stars stand for your folder)
    5. If you cannot access the folder because it has spaces for example Program Files or Kazaa Lite folder you have to do the following. instead of typing in the full folder name only take the first 6 letters then put a ~ and then 1 without spaces. Example: cd c:\progra~1\kazaal~1
    6. Once your in the folder the non-deletable file it in type in dir - a list will come up with everything inside.
    7. Now to delete the file type in del ***.bmp, txt, jpg, avi, etc... And if the file name has spaces you would use the special 1st 6 letters followed by a ~ and a 1 rule. Example: if your file name was bad file.bmp you would type once in the specific folder thorugh command, del badfil~1.bmp and your file should be gone. Make sure to type in the correct extension.

      About Me

      Followers